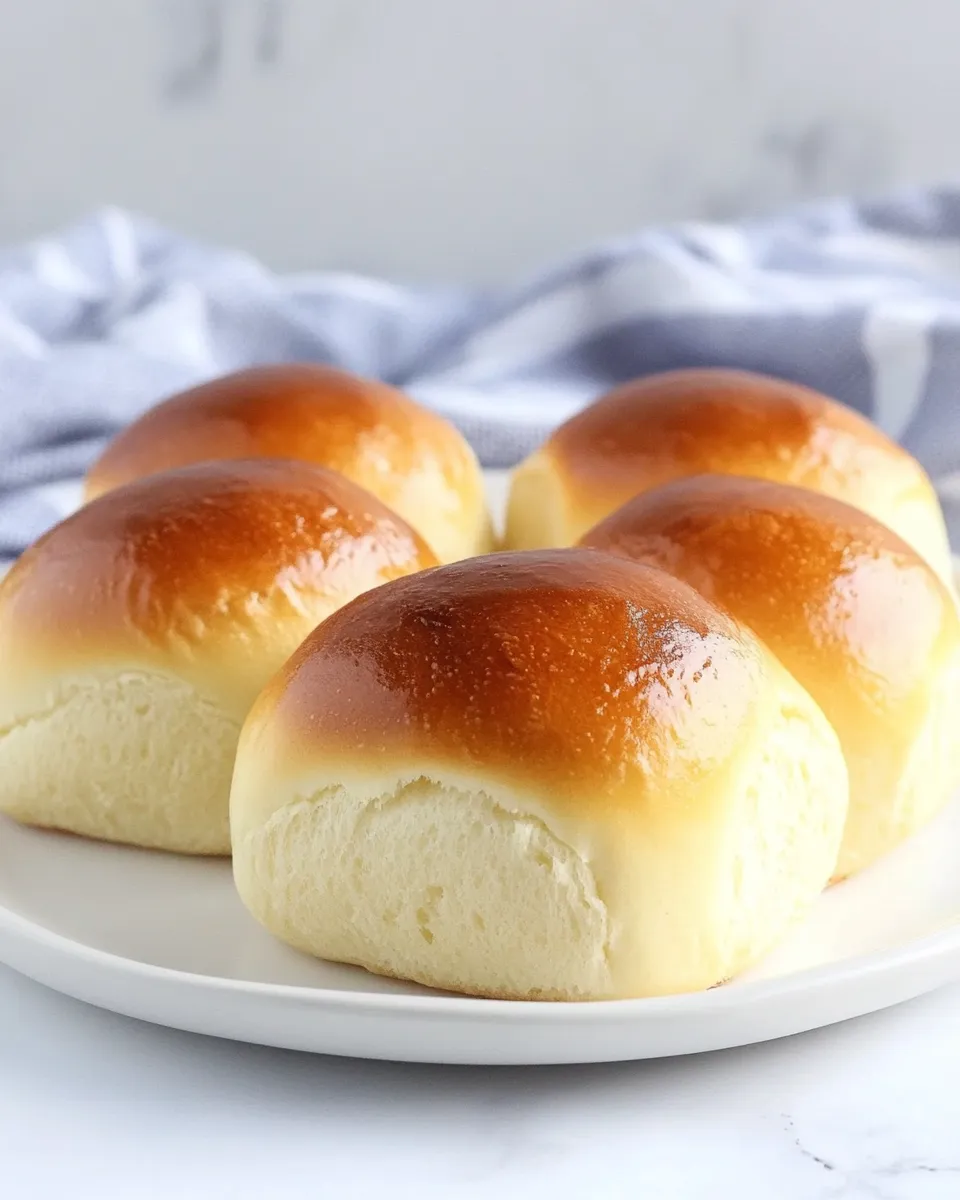
Brioche Bun Recipe
There’s something undeniably delightful about a freshly baked brioche bun. With its rich, buttery flavor and soft, pillowy texture, it elevates any meal, from gourmet burgers to decadent sandwiches. Imagine biting into one of these golden beauties, the slight sweetness mingling with the savory fillings. This brioche bun recipe will guide you through the steps to create perfect buns that can be enjoyed on their own or as a part of your favorite dish. Let’s dive into the details!
Top Reasons to Make Brioche Bun Recipe

– **Versatility**: These buns can be used for burgers, sandwiches, or even enjoyed with a spread of homemade butter.
– **Flavor**: The rich, buttery taste makes every bite a gourmet experience.
– **Texture**: Light and airy, yet sturdy enough to hold fillings without falling apart.
– **Impress Your Guests**: Homemade brioche buns are sure to wow family and friends, making any meal feel special.
– **Freshness**: There’s nothing like the aroma of freshly baked bread wafting through your kitchen.
Ingredient Notes
To make these delightful brioche buns, you will need the following ingredients:
- 3 1/3 cups all-purpose flour: Provides the structure for the buns.
- 1 1/2 teaspoons instant yeast: Helps the dough rise quickly.
- 1 1/2 tablespoons granulated sugar: Adds a touch of sweetness.
- 1 teaspoon salt: Enhances the overall flavor.
- 4 tablespoons unsalted butter: For richness and flavor.
- 3 tablespoons milk: Adds moisture and a soft texture.
- 1 cup lukewarm water: Activates the yeast.
- 2 large eggs: Provides structure and richness.
- 1 tablespoon water: For egg wash to give a beautiful golden color.
Equipment at a Glance
- Mixing bowl: For combining ingredients.
- Dough scraper: Helpful for handling sticky dough.
- Measuring cups and spoons: Ensure accurate measurements.
- Baking sheet: To bake the buns.
- Parchment paper: To prevent the buns from sticking.
- Kitchen towel: For covering the dough while it rises.
From Start to Finish: Brioche Bun Recipe

Step 1: Prepare the Dough
In a large mixing bowl, combine the all-purpose flour, instant yeast, granulated sugar, and salt. Whisk together to ensure the dry ingredients are well mixed.
Step 2: Add Wet Ingredients
Make a well in the center of the dry mixture and add the lukewarm water, milk, and 2 large eggs. Start mixing with a wooden spoon or your hands until the dough begins to come together.
Step 3: Incorporate the Butter
Melt the unsalted butter and let it cool slightly before adding it to the dough. Knead the dough in the bowl or on a lightly floured surface for about 10 minutes, until it’s smooth and elastic.
Step 4: First Rise
Place the dough in a lightly greased bowl, cover it with a damp kitchen towel, and let it rise in a warm area for about 1 to 2 hours, or until it has doubled in size.
Step 5: Shape the Buns
Once the dough has risen, punch it down to release the air. Divide it into 8 equal pieces and shape each piece into a ball. Place them on a baking sheet lined with parchment paper, leaving space between each bun.
Step 6: Second Rise
Cover the buns with a kitchen towel and let them rise again for about 30 to 45 minutes, until they puff up.
Step 7: Preheat the Oven
Preheat your oven to 375°F (190°C).
Step 8: Egg Wash
In a small bowl, whisk together the remaining 1 large egg and 1 tablespoon of water. Brush this mixture over the tops of the buns to achieve a beautiful golden color once baked.
Step 9: Bake
Bake the buns in the preheated oven for about 15 to 20 minutes, or until they are golden brown and sound hollow when tapped on the bottom.
Step 10: Cool
Remove the buns from the oven and let them cool on a wire rack before serving. Enjoy them fresh or store them for later!
Easy Ingredient Swaps

- Butter: Use plant-based butter for a dairy-free option.
- Milk: Substitute with almond milk or oat milk if you prefer a non-dairy option.
- Eggs: Replace with flaxseed meal mixed with water for a vegan alternative.
- All-purpose flour: Whole wheat flour can be used for a more nutritious option, but it may change the texture slightly.
Troubles You Can Avoid
To ensure your brioche buns turn out perfectly, here are some common issues and how to avoid them:
- Dense Buns: Make sure your yeast is fresh and active. If it doesn’t foam in warm water, it’s best to start with new yeast.
- Dry Dough: If the dough feels too dry, add a tablespoon of water at a time until it reaches the desired consistency.
- Overproofing: Keep an eye on the dough during the second rise; if it rises too much, it might collapse when baking.
- Burnt Buns: Check your oven temperature with an oven thermometer to ensure accuracy.
Freezer-Friendly Notes
These brioche buns can be a great make-ahead option! Once they are completely cooled, you can freeze them in an airtight container for up to 3 months. To reheat, simply thaw them at room temperature and warm them in the oven for a few minutes before serving.
Quick Q&A
Can I make the dough ahead of time?
Yes! You can prepare the dough and let it rise in the fridge overnight. Just bring it back to room temperature before shaping and baking.
How long do the brioche buns last?
They are best enjoyed fresh but can last up to 3 days at room temperature in an airtight container.
Can I use bread flour instead of all-purpose flour?
Absolutely! Bread flour will yield a chewier texture, but your buns will still be delicious.
What can I serve with brioche buns?
These buns are perfect for sliders, gourmet sandwiches, or even as a sweet treat with jam and Mini Milk Bread Rolls.
Next Steps
Now that you have mastered this brioche bun recipe, it’s time to get baking! Gather your ingredients and let the aroma of freshly baked buns fill your kitchen. Whether you’re serving them at a special occasion or just enjoying them with a simple meal, these brioche buns are sure to impress. Don’t forget to share your baking adventures with friends and family; they’ll be amazed at your culinary skills! Happy baking!
Brioche Bun Recipe
Ingredients
Equipment
Method
- In a large mixing bowl, combine the all-purpose flour, instant yeast, granulated sugar, and salt. Whisk together to ensure the dry ingredients are well mixed.
- Make a well in the center of the dry mixture and add the lukewarm water, milk, and 2 large eggs. Start mixing with a wooden spoon or your hands until the dough begins to come together.
- Melt the unsalted butter and let it cool slightly before adding it to the dough. Knead the dough in the bowl or on a lightly floured surface for about 10 minutes, until it’s smooth and elastic.
- Place the dough in a lightly greased bowl, cover it with a damp kitchen towel, and let it rise in a warm area for about 1 to 2 hours, or until it has doubled in size.
- Once the dough has risen, punch it down to release the air. Divide it into 8 equal pieces and shape each piece into a ball. Place them on a baking sheet lined with parchment paper, leaving space between each bun.
- Cover the buns with a kitchen towel and let them rise again for about 30 to 45 minutes, until they puff up.
- Preheat your oven to 375°F (190°C).
- In a small bowl, whisk together the remaining 1 large egg and 1 tablespoon of water. Brush this mixture over the tops of the buns to achieve a beautiful golden color once baked.
- Bake the buns in the preheated oven for about 15 to 20 minutes, or until they are golden brown and sound hollow when tapped on the bottom.
- Remove the buns from the oven and let them cool on a wire rack before serving.
Notes
- For a dairy-free option, use plant-based butter.
- Substitute milk with almond or oat milk for a non-dairy version.
- Store cooled buns in an airtight container for up to 3 days at room temperature.