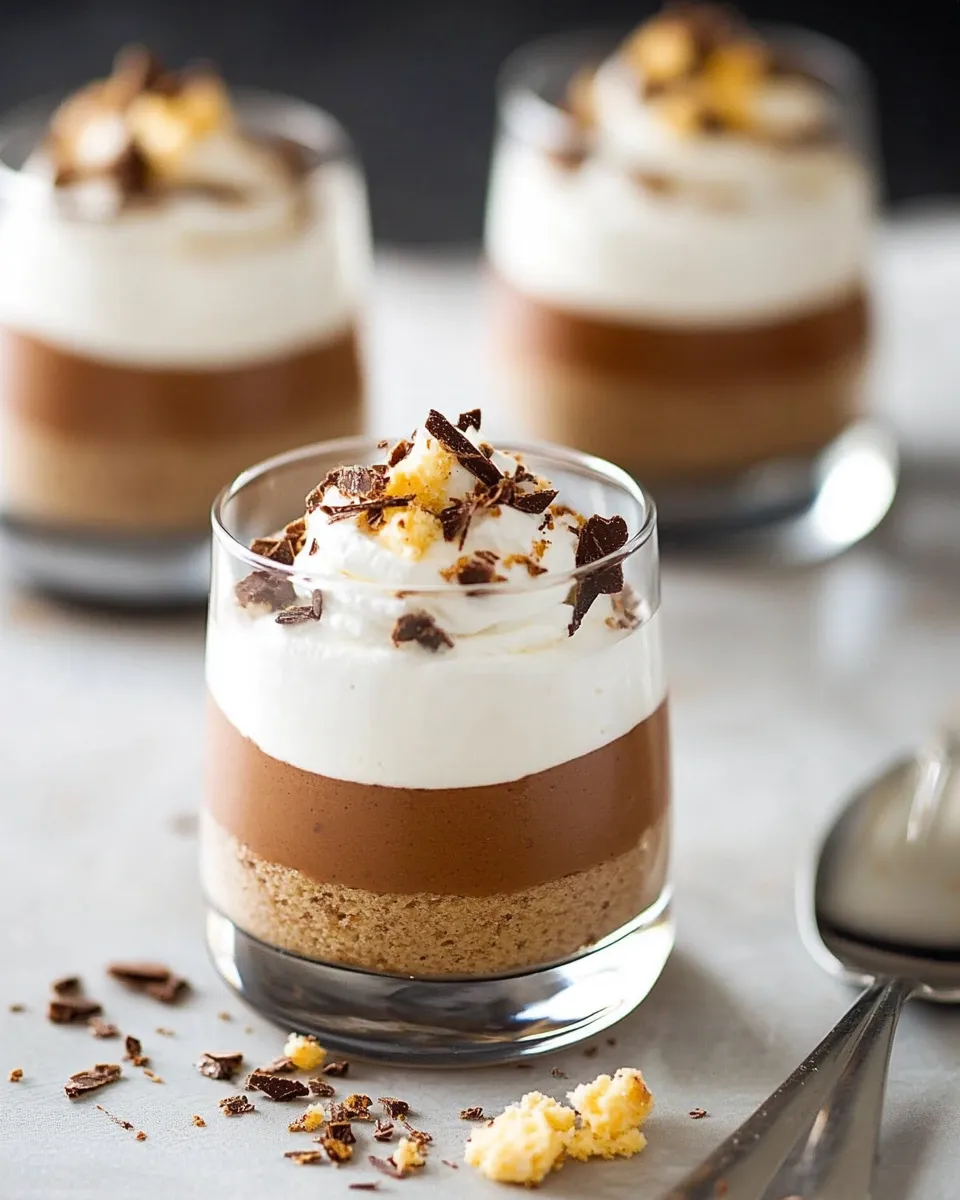
Nutella Cheesecake Mousse
If you’re a fan of rich, creamy desserts that pack a punch of flavor, then this Nutella Cheesecake Mousse is just what you need! Combining the decadent taste of Nutella with the lusciousness of cheesecake, this mousse is a delightful treat for any occasion. It’s simple to make, requires no baking, and is sure to impress your friends and family. Plus, it uses Oreos for a delightful cookie crust that enhances the overall flavor. Let’s dive right into the details of this scrumptious dessert!
Why This Recipe Works

This recipe for Nutella Cheesecake Mousse works wonderfully because it combines the beloved flavors of Nutella and cheesecake into a light and airy mousse. The crushed Oreos provide a perfectly balanced crust, while the creamy filling melts in your mouth. The use of heavy cream adds a richness that contrasts beautifully with the lightness of the mousse, making it an indulgent yet satisfying dessert. Additionally, this recipe is adaptable, allowing you to experiment with toppings and flavors as you see fit.
Ingredients at a Glance
- 12 Oreos (leave in cream filling, do not use Double Stuf)
- 2 Tbsp butter, melted
- 1 1/3 cups heavy cream
- 4 Tbsp granulated sugar, divided
- 1 Tbsp unsweetened cocoa powder
- 8 oz cream cheese, softened
- 1/2 cup + 2 Tbsp Nutella
- 1/2 tsp vanilla extract
- 2/3 cup heavy cream
- 1 1/2 Tbsp granulated sugar
- Toasted, chopped hazelnuts (optional)
- Chocolate shavings or sprinkles (optional)
Tools & Equipment Needed
- Mixing bowls – For combining ingredients.
- Electric mixer – To achieve the desired fluffiness in the mousse.
- Spatula – For folding in ingredients without deflating the mixture.
- Measuring cups and spoons – For accurate ingredient measurement.
- Serving cups – To present your mousse beautifully.
From Start to Finish: Nutella Cheesecake Mousse

Step 1: Prepare the Oreo Crust
Start by finely crushing the 12 Oreos in a food processor until they resemble fine crumbs. In a mixing bowl, combine the crushed Oreos with 2 tablespoons of melted butter. Mix until the crumbs are evenly coated. Press this mixture firmly into the bottom of your serving cups to create a crust. Set aside.
Step 2: Whip the First Batch of Cream
In a separate mixing bowl, whip 1 1/3 cups of heavy cream and 2 tablespoons of granulated sugar together until stiff peaks form. This will give your mousse a light and airy texture, so take your time with this step!
Step 3: Combine the Cream Cheese and Nutella
In another bowl, beat the softened cream cheese with the remaining 2 tablespoons of sugar and the 2/3 cup of heavy cream until smooth. Add in the Nutella and vanilla extract, mixing until well combined. You want a creamy, smooth mixture that is fully blended.
Step 4: Fold in the Whipped Cream
Gently fold the whipped cream into the Nutella and cream cheese mixture using a spatula. Be careful not to deflate the whipped cream; you want to maintain that fluffy texture.
Step 5: Chill the Mousse
Once combined, spoon the mousse mixture over the prepared Oreo crusts in your serving cups. Smooth the top with a spatula. Cover the cups with plastic wrap and refrigerate for at least 2 hours to allow the flavors to meld and the mousse to set properly.
Step 6: Serve with Toppings
Before serving, you can sprinkle the tops of the mousse with toasted, chopped hazelnuts and/or chocolate shavings or sprinkles for an extra touch of elegance. These optional toppings add a nice crunch and additional flavor to your dessert.
Better-for-You Options
- Use low-fat cream cheese for a lighter version.
- Opt for sugar substitutes if you’re looking to reduce sugar intake.
- Replace heavy cream with coconut cream for a dairy-free option.
Slip-Ups to Skip
To ensure your Nutella Cheesecake Mousse turns out perfectly, here are some common pitfalls to avoid:
- Don’t rush the whipping process; under-whipped cream won’t provide the desired lightness.
- Make sure your cream cheese is at room temperature for easy mixing.
- Avoid over-folding the whipped cream into the Nutella mixture to maintain the mousse’s airy texture.
- Be patient with chilling time; the mousse needs adequate time to set.
Leftovers & Meal Prep
If you have leftovers, you can store the mousse in the refrigerator for up to 3 days. Just be sure to cover the cups tightly with plastic wrap to maintain freshness. This mousse can also be made in advance, making it a perfect dessert for gatherings. Just prepare it a day ahead and let it chill overnight for the best flavor.
Troubleshooting Q&A
What should I do if my mousse is too runny?
If your mousse turns out runny, it may be due to under-whipped cream. Make sure to whip your cream to stiff peaks before folding it into the other ingredients. If it still seems too loose, you can try chilling it longer to allow it to set more firmly.
Can I use a different type of chocolate spread instead of Nutella?
Absolutely! You can use any chocolate hazelnut spread you prefer. Just keep in mind that different brands may alter the flavor slightly, but it will still be delicious!
How can I make this recipe gluten-free?
To make a gluten-free version of this mousse, simply replace the Oreos with gluten-free chocolate cookies. The rest of the ingredients are naturally gluten-free, so you’re good to go!
Is it possible to freeze the mousse?
While it’s not recommended to freeze mousse because it may change the texture, you can freeze the Oreo crust separately. If you do freeze the mousse, allow it to thaw in the refrigerator before serving to restore some creaminess.
See You at the Table
Indulging in a dessert like Nutella Cheesecake Mousse is about more than just satisfying a sweet tooth; it’s about sharing moments with loved ones and creating lasting memories. Whether you’re entertaining guests or treating yourself, this mousse is certain to be a crowd-pleaser. Whip it up and bring it to your next gathering, and you’ll surely be the star of the dessert table. Enjoy every spoonful of this delightful treat!
Nutella Cheesecake Mousse
Ingredients
Equipment
Method
- Start by finely crushing the 12 Oreos in a food processor until they resemble fine crumbs. In a mixing bowl, combine the crushed Oreos with 2 tablespoons of melted butter. Mix until the crumbs are evenly coated. Press this mixture firmly into the bottom of your serving cups to create a crust. Set aside.
- In a separate mixing bowl, whip 1 1/3 cups of heavy cream and 2 tablespoons of granulated sugar together until stiff peaks form. This will give your mousse a light and airy texture, so take your time with this step!
- In another bowl, beat the softened cream cheese with the remaining 2 tablespoons of sugar and the 2/3 cup of heavy cream until smooth. Add in the Nutella and vanilla extract, mixing until well combined. You want a creamy, smooth mixture that is fully blended.
- Gently fold the whipped cream into the Nutella and cream cheese mixture using a spatula. Be careful not to deflate the whipped cream; you want to maintain that fluffy texture.
- Once combined, spoon the mousse mixture over the prepared Oreo crusts in your serving cups. Smooth the top with a spatula. Cover the cups with plastic wrap and refrigerate for at least 2 hours to allow the flavors to meld and the mousse to set properly.
- Before serving, you can sprinkle the tops of the mousse with toasted, chopped hazelnuts and/or chocolate shavings or sprinkles for an extra touch of elegance. These optional toppings add a nice crunch and additional flavor to your dessert.
Notes
- For a lighter version, use low-fat cream cheese.
- Try sugar substitutes to reduce sugar intake.
- Coconut cream can be used instead of heavy cream for a dairy-free option.